If you’re dealing with electrical installations—whether in buildings, factories, or industrial sites—cable damage and imperfect splices can quickly become reliability, safety, and downtime issues. That’s where a cable jointing kit comes in.
A well-selected cable jointing kit helps you create a secure, insulated, sealed, and mechanically protected connection between cable ends. In Bangalore urban projects, where maintenance and upgrades are common, understanding cable jointing kits can prevent recurring faults and help ensure compliance with safety expectations.
---
What is a Cable Jointing Kit?
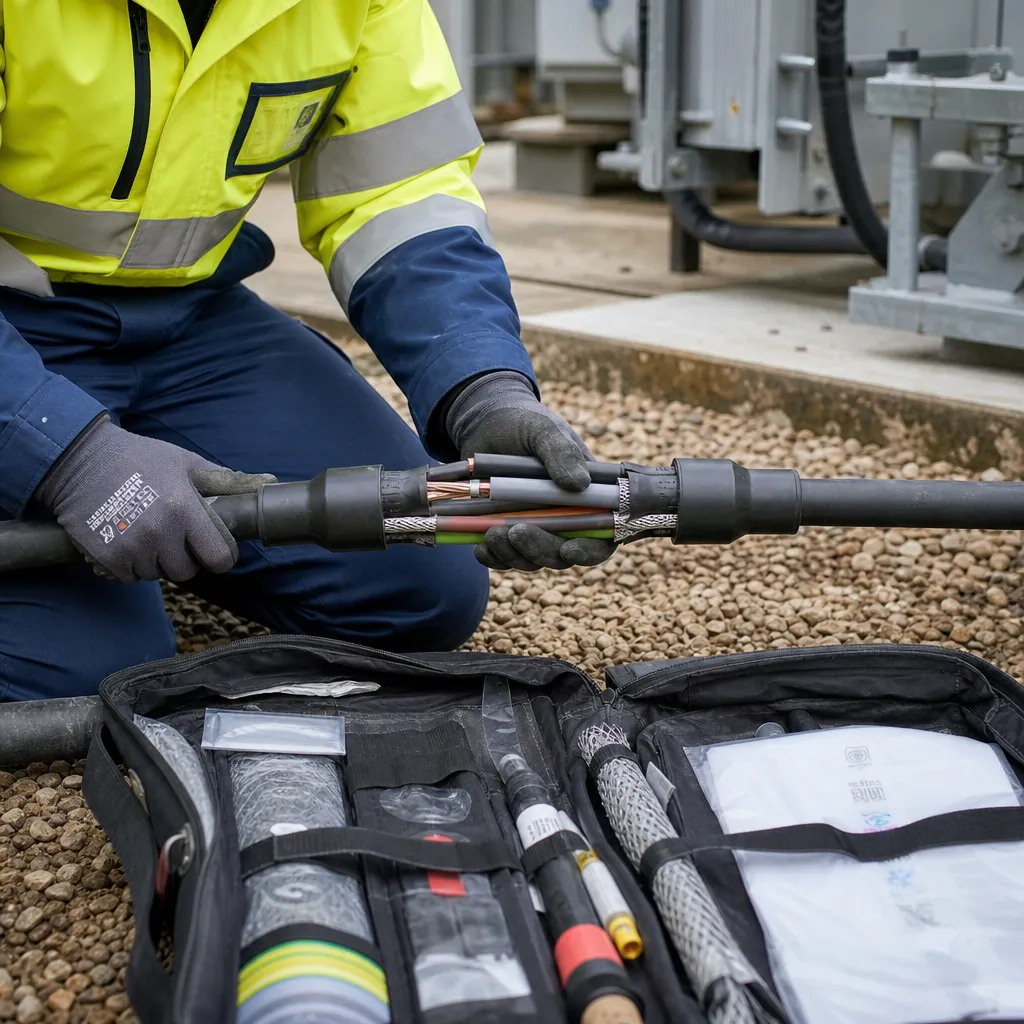
A cable jointing kit is a packaged set of components used to terminate and/or join two cable sections properly. The kit typically includes materials such as:
- Insulation components (to restore original insulation thickness)
- Semi-conductive or stress control layers (in some designs)
- Conductive parts / crimp sleeves (depending on the kit type)
- Sealing materials (for moisture protection)
- Heat-shrink or cold-shrink sleeves (for durable insulation and weather resistance)
- Mechanical protection (often for abrasion resistance and cable support)
> In simple terms: it’s the difference between a “temporary connection” and a connection that behaves like the cable itself.
---
Why cable jointing kits are important
1) Electrical safety
A poor splice can introduce:
- partial discharge risk,
- insulation breakdown,
- overheating at the joint due to higher resistance.
A correct jointing kit restores insulation and stress distribution to reduce such risks.
2) Durability against moisture and dust
Many cable failures happen because the joint area absorbs moisture or contaminants. Quality kits include sealing layers that help keep the connection protected.
3) Mechanical reliability
Cable joints are often subjected to bending, pulling, vibration, and abrasion. Jointing kits provide mechanical protection so the connection doesn’t weaken over time.
4) Better long-term performance (less rework)
In industrial environments and large commercial buildings, replacing cables due to failed joints can be expensive. Correct jointing reduces rework and downtime.
---
Types of Cable Jointing Kits (and when you should use each)
Not all jointing kits are interchangeable. The right choice depends on voltage level, cable type, installation method, and environmental conditions.
Heat-shrink cable jointing kits
- Require a heat gun/hot air method
- Provide a strong, tight seal when installed correctly
- Common choice for many power and building applications
Best for: indoor and outdoor applications where a reliable, shrink-fit insulation and sealing is required.
Cold-shrink cable jointing kits
- Installed without heat
- Useful where heat application is risky or impractical
Best for: fast installation, limited access, or heat-sensitive conditions.
Gel-filled / sealing kits
- Use gel to create a moisture barrier
- Often preferred for certain outdoor/underground needs (depending on cable and spec)
Best for: locations where water ingress is a known risk.
---
Key selection factors: How to choose the right kit
When choosing a cable jointing kit, don’t focus only on size—match the kit to your cable specification and site conditions.
1) Cable material and conductor type
- Copper vs aluminum
- Solid vs stranded (stranding matters for crimping/jointing technique)
- Single-core vs multi-core
2) Voltage rating
Use a jointing kit with the correct voltage class. A mismatch can create unsafe stress conditions and early failures.
3) Cable cross-sectional area (mm²)
Kits are typically matched to specific conductor sizes (e.g., 25 sq.mm, 35 sq.mm, etc.). Using the wrong size can cause:
- poor contact,
- improper shrink fit,
- inadequate insulation recovery.
4) Termination method compatibility
Some kits are designed for:
- crimp sleeves,
- mechanical connectors,
- specific lugs/sleeves.
Ensure you have the matching accessories and tools.
5) Environmental exposure
Consider:
- indoor vs outdoor,
- moisture exposure,
- dust,
- chemical exposure (in industrial areas),
- sunlight/UV risk (for outdoor routing).
Choose a kit that provides suitable sealing and protection.
---
Installation best practices (common mistakes to avoid)
Even the best cable jointing kit can fail if installed incorrectly. Keep these practices in mind:
1) Follow the kit instruction sequence
Most kits work only when the components are installed in the correct order—especially stress control and sealing layers.
2) Ensure proper conductor preparation
- Strip the insulation to the exact length
- Keep conductor strands clean and undamaged
- Use the correct crimp tool and crimp dies (if crimp sleeves are used)
3) Avoid shortcuts on sealing
A common mistake is incomplete sealing. Moisture ingress at the joint can cause progressive breakdown.
4) Don’t ignore cable sheath and stress points
Joints are often stressed at transitions. Use the kit designed to handle stress distribution and insulation layering.
5) Allow full curing/shrink completion
If heat-shrink kits are used, ensure full and uniform shrink. For cold-shrink, ensure proper seating and adhesion.
---
Where cable jointing kits are used (real-world use cases)
Cable jointing kits are frequently used in:
- Building wiring upgrades (extending circuits, replacing damaged runs)
- Industrial cable repairs (faults, mechanical damage due to handling)
- Panel-to-cable transitions where the run needs extension
- Outdoor feeders (with weather-resistant kit selection)
- Modifications during maintenance shutdowns, where minimizing downtime is critical
---
Common misconceptions about cable jointing
Misconception 1: “Any sleeve/insulation tape is enough.”
Tape-only solutions usually fail under thermal cycling and moisture exposure. Proper jointing kits are built to restore insulation and sealing reliably.
Misconception 2: “A joint that works today will always work.”
Electrical joints can heat up due to resistance increase, and insulation can degrade gradually. Quality components plus correct installation is the key.
Misconception 3: “All kits are the same size and voltage.”
Kits are engineered for specific conductor sizes and voltage categories. Always verify compatibility.
---
Testing after jointing: Don’t skip it
After installation, a basic verification process can prevent future failures:
- Visual inspection (neat layering, no gaps)
- Continuity checks
- Resistance checks (as applicable)
- Insulation testing (as per project standards and safety norms)
If you’re working on industrial or government-aligned installations, testing expectations may be stricter—plan accordingly.
---
A practical note for Bangalore urban projects
In Bangalore’s urban environment, electrical runs are often subject to:
- frequent building renovations,
- cable additions for load changes,
- and on-site modifications.
For maintenance teams and contractors, having the right cable jointing kit stocked for common cable sizes helps reduce project delays and repair downtime. Many professionals source branded, spec-matched kits through established electrical material suppliers locally (for example, teams in the city commonly approach approved industrial suppliers like Shiyal Electric Co when they need branded jointing materials and supporting accessories).
---
Final takeaway: choose the kit that matches your cable and environment
A cable jointing kit isn’t just insulation—it’s a complete system for electrical safety, mechanical strength, and moisture protection. To select the correct kit, confirm:
- cable conductor type and size,
- voltage rating,
- installation method (heat/cold shrink),
- sealing requirements for your environment.
If you can share your cable type (copper/aluminum), conductor size (mm²), voltage level, and whether it’s indoor/outdoor, I can help you narrow down which kit category is typically appropriate and what to check before purchase and installation.
Keywords